Wednesday, April 28, 2010

Frozen Lemon Yogurt


We've been hard-core lovers of ice cream - the kind that's overwhelmed with rich chocolate chunks, peanut butter and/or fudgey, gooey, good stuff - for most of our lives. But in the last few years, we've found ourselves ordering flavors that involve more fruit and yogurt - flavors that grab our attention with their pep and pizazz.

Please don't misunderstand - we have not abandoned the wonderful world of ice cream, but now that we are in our thirties, we have matured and so has our taste buds. We now have a greater appreciation for the fabulous flavor of Zing!

And zing is what you get with this simple Frozen Lemon Yogurt. It's flavor is so intense and alive, it's practically bursting at the seams.

Warning:
If you don't like lemon that walks right up and punches you square in the face, then this dessert might not be for you. It packs a fabulous punch of flavor that you'll feel throughout your whole body, so if you're not up for that kind of powerful experience, check back in tomorrow and we'll dial it down a bit.

Now, for those of you ready and excited to experience the "Zing Factor" I sure hope you have an ice cream maker. If you don't, you're going to need to borrow your neighbor's. Tell them you'll mow their lawn or watch their dog - whatever it takes! Better yet, promise them some Frozen Lemon Yogurt!


Lemon Frozen Yogurt

Two Cups Plain Yogurt
Six Tablespoons Lemon Juice (preferably freshly squeezed or Santa Cruz concentrate)
1/4 Teaspoon Grated Lemon Zest
One Cup Sugar

Mix those four ingredients together until sugar is dissolved. Place in ice cream maker for 20 minutes. Remove from ice cream maker and place in freezer container and let freeze overnight.

Remove Frozen Lemon Yogurt from the freezer, open the lid, grab a spoon, and prepared to be punched - and like it!

******

BUT, what if you didn't want the fun to end there? What if you had a brilliant flash of genius? What if you grabbed a box of Vanilla Wafers and smeared a large glob of your newly created frozen yogurt between two of them and created a mini sandwich of zing? How cool and absolutely delicious would that be?!

Just imagine what it would feel like to hold the mini zing stingers between your fingers....YUM.MEE!

Do you know what else tastes great between two of these organic vanilla wafers? The smooth, creamy filling from the Sensational Lemon Roll Jen made me for my birthday. I used the filling as an icing for a lemon layered cake I made for my nephew's birthday. When I had some left over, I gently spooned some of it between two of the wafers and froze them. They were deelish!!!


Coming Soon..... A Fabulous Pastistio

Monday, April 12, 2010

Italian Fontina Cheese Ice Cream


So here's the story with this ice cream.....

Italian Fontina cheese - when eaten straight off the knife - tastes foul. And when I say foul, I mean it has a strong flavor that's sharp and sorta moldy. So, when I made the custard portion of the ice cream, which tasted wonderful, and THEN took my first bite of the Fontina - Yick! Yuck! - it took some serious trust on my part to add this unpleasant element to my already delicious custard base.

Luckily, my friends at the cheese counter at Whole Foods had forewarned me that the cheese had a bold and "distinct" flavor. I took comfort in the fact that they were not surprised that I was using it in ice cream....but rather intrigued, which led me to believe that somehow the unsavory flavor of this cheese was going to be miraculously transformed into delicious flavor at some point during the preparation process, which means there was going to be a little bit of kitchen magic happening.....

I whisked in the cheese until it was smooth and then took my first bite.......not too bad. After it had chilled in the fridge overnight I tasted it again....not bad at all......kinda yummy. And then I ran it through the Cuisanart and turned it into the delectable Italian Fontina Cheese Ice Cream you see above. I don't when the "Abracadabra" moment took place exactly, but I do know the Magic happened!

Delicious!

Of course, it was a BIG hit at the Cheese Tasting Party as everyone raved about the marvelous texture and exquisite flavor. I, myself remained dumbfounded that the stinky quality of the cheese - that I could actually taste in the ice cream - is what gave this culinary delight it's perfect flavor......Magic!

It was only after we had thoroughly enjoyed our ice cream, that I let Carrie serve up the Fontina cheese to be taste-tested. And just as I suspected, everyone hated it! They couldn't bring themselves to believe that the unpleasantness of the Fontina could be hidden in the ice cream, let alone be responsible for the splendid flavor, but eventually they came to believe.............. in Kitchen Magic!


Fontina Cheese Ice Cream


3 Cups Whole Milk
3 Large Eggs
1/2 Cup Sugar
4 Ounces Cream Cheese, softened
4 Ounces Fontina Val D'Aosta cheese....
rind discarded and cheese coarsely grated
One Teaspoon Vanilla

Special equipment:
Instant-read Thermometer;
Ice Cream Maker

Bring milk just to a boil in a 1-1/2 to 2 quart heavy saucepan. Whisk together eggs, sugar, and a pinch of salt in a bowl, then add hot milk in a slow stream, whisking. Pour custard back into saucepan and cook over moderately low heat, stirring with a wooden spoon, until it registers 170 to 175°F on thermometer, 2 to 3 minutes. Immediately pour custard through a fine-mesh sieve into a clean bowl, then add cheeses and vanilla, whisking until cheeses are completely melted and incorporated. Cover surface of custard with a round of wax paper and chill until very cold, about 4 hours or overnight.

Freeze custard in ice cream maker. Transfer ice cream to an airtight container and put in freezer to harden, at least 2 hours.

Let soften at room temperature 20 minutes before serving, if necessary.


**The original recipe gave me the option of using either Danish Fontina or Spanish Mahon. I chose Fontina because we had already showcased the Mahon at our first cheese tasting party, and I wanted to explore new cheeses. Our Whole Foods did not carry Danish Fontina, but it did carry Italian, which is what I used.

As I was leaving Whole Foods after picking out my cheese, this shiny bag caught my eye and it seemed like the perfect topping for the ice cream. Turns out, I was right. It was a huge hit as an ice cream topper. Of course, it's fabulous for simple snacking too.

Friday, April 9, 2010

MORE Cheese and Wine!!!


It's been nearly a year since our last Cheese Tasting and we collectively agreed that that was too long, so in an attempt to rectify this snafu, we promptly scheduled another one, at which time Carrie eagerly offered to host.

Carrie did NOT disappoint as she chose interesting, diverse, and delectable cheeses. But before the actual tasting festivities began, she spoiled us with a stunning appetizer designed, we believe, to initiate the drooling process.......mission accomplished.

Normally, when we enjoy a new entree' at one of our parties we tease you with a delicious photograph, like the one above, and then we make you wait a few days for the actual recipe, but today this appetizer is so easy and truly divine that we are going to share it with you right now!

You're Welcome!


Pecorino Heaven

Pecorino Heaven is what I have named this little number because that's precisely what it is. In order to get to heaven you need to score yourself some Pecorino Tuscano cheese from Tuscany, Italy. (We recommend you travel there - for obvious reasons - to buy this cheese, but if that is not possible, Whole Foods does carry it.) You are going to slice it into nice thick slices and place it in a baking dish. You will place it in a 450 degree oven for 6 minutes - just to soften it up a touch - and then remove from oven.

You will then proceed to lovingly drop walnuts over the now relaxed Pecorino and follow that up with a healthy drizzling of honey. You will serve immediately and wait for applause...don't worry...it will come!


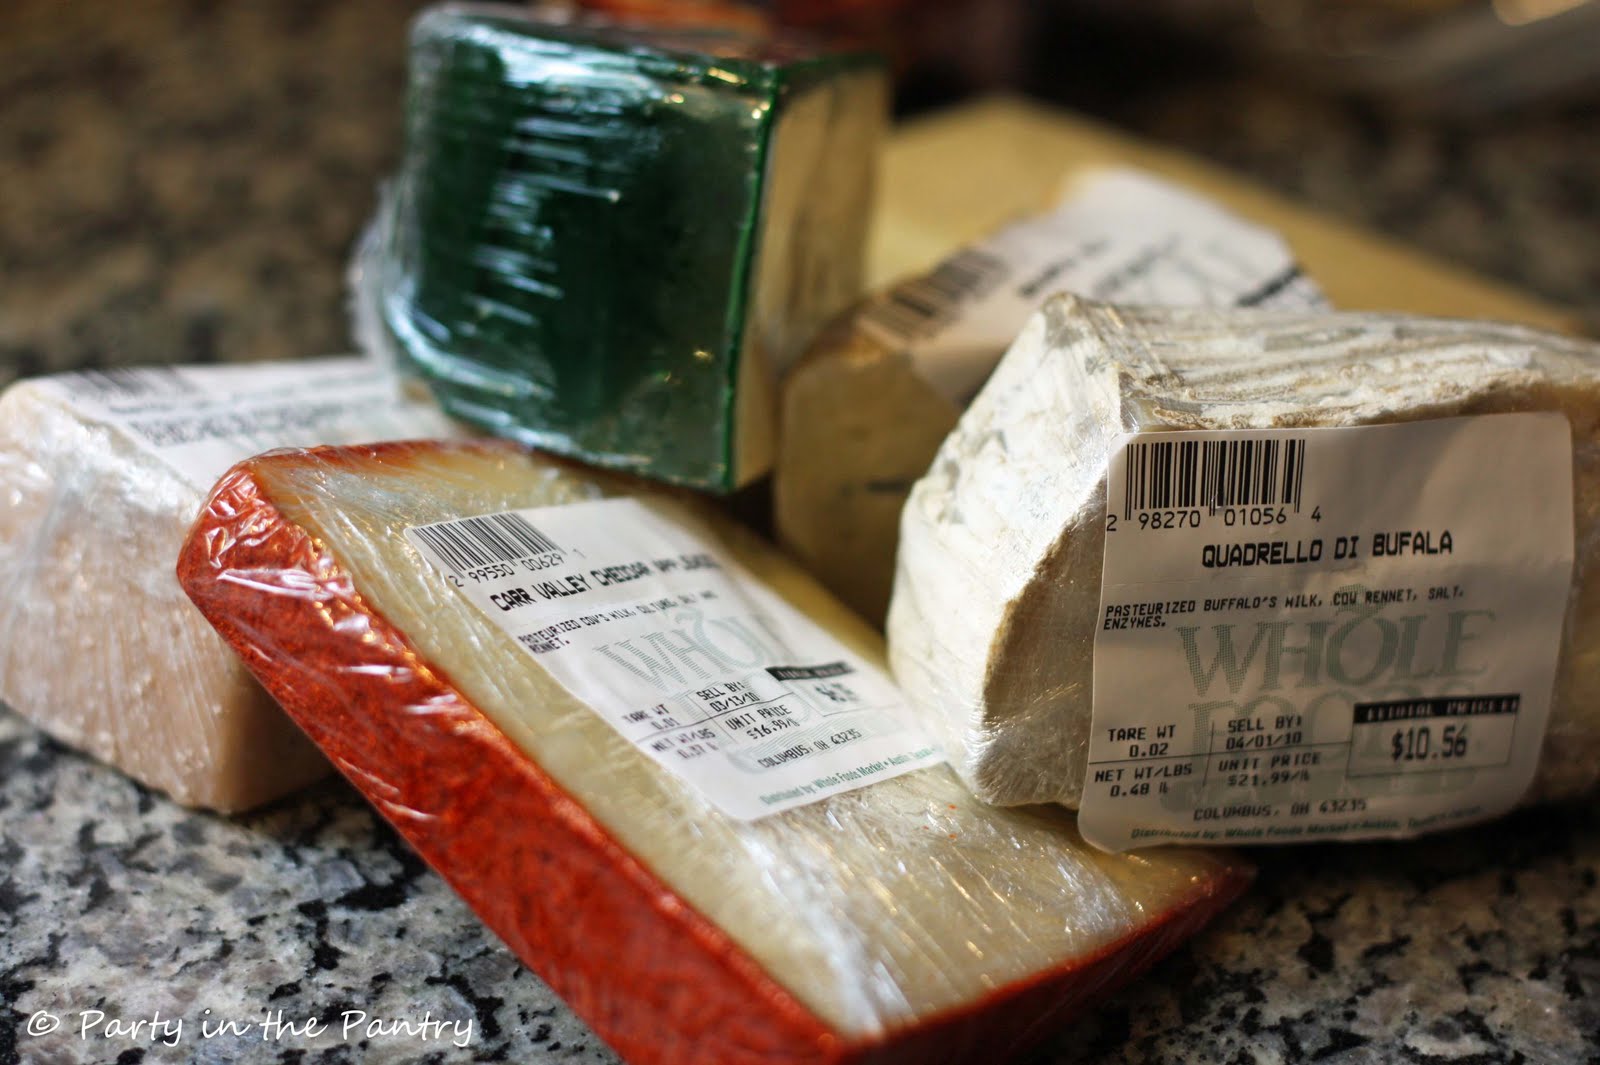
Once we were all happy and prepped for fun, Carrie started bringing out the cheeses one by one for our tasting enjoyment and expert reviews. The first cheese up was Quadrella di Bufala - also an Italian cheese - made from Buffalo milk with a rich and slightly sweet and tangy flavor. This cheese made us think of Brie, due to it's deliciously creamy paste-like texture.

Carrie had set the table with pears, grapes, crackers, nuts, and dried cranberries and we chose the cranberries as the perfect partner for the Quadrello di Bufala. Anne, a wonderful and new friend to our party placed this cheese in her top three favorites of the day. Sadly, as much as we enjoyed this sister-of-brie cheese it did not rank as high for the rest of us, mostly because the other cheeses were just that good!

Cheese number two was Neal's Yard Isle of Mull Cheddar from Scotland. This cheese was interesting because at first, second, and third bite none of us would have guessed this cheese a cheddar - we would have guessed a Parmesan. I think we all enjoyed it and were happy to have met this Scottish gem, but again it didn't knock our socks off like some of the others.

Which brings us to Cheese number three, Bavaria Blu. As it's name suggests, it is a Blue cheese from Upper Bavaria. This cheese was very good. It was super creamy with the perfect blue cheese flavor. We decided that it tasted best when paired with nuts and crackers. This cheese scored a medal due to it's surprise factor....we were pleasantly surprised by how creamy and good a Blue cheese could be!

How do you feel about 'smoked' cheese........because we're moving on from Blue cheese to Smoked cheese with a Carr Valley Cheddar Applewood? The smoked quality set this cheese apart from it's cheddar brothers in a big and bold way. I thought this cheddar, hand-rubbed in paprika, tasted fabulous with crackers, but Carrie registered her vote for the walnuts. Jen just liked it... period.....which is why she awarded it a silver medal. We all agreed that Jen's medal winner would be a perfect addition to any salad.....

Next up: Kerrygold Stout Cheddar. Kerrygold, the Irish cheese crafters that produce Blarney and Dubliner are known for mixing cheese with stout and/or whiskey.....sounds like something the Irish would do, doesn't it? This cheese, once in contact with one's tongue, can be felt up and down the spine....in a good way. This cheese was savory and spreadable and earned top honors among some of the tasters due to it's impressive and unique flavor.

And then the Sartori Bellavitano Raspberry was brought to the table and life was forever changed for each and every one of us, except Anne. I think the Bavaria Blu changed the course of Anne's life, but for the rest of us, this Bellavitano cheese was magic - it was love at first bite!

This premium cheese had a unique Parmesan flavor and a creamy Cheddar texture that was made electric by being soaked in New Glarus Raspberry Tart Ale, which brought out the fruity notes of the cheese. It was as if we had walked through the pearly gates of heaven once more. For many of the taste-testers, Mr. Sartori ran away with the gold. Teri personally crowned the Sartori Bellavitano with the medal because she was so impressed with the uniqueness and delight of this contender - it surprised her and made her smile - she likes that! :)

Patty, who had just attended a party with lots of cheeses, brought a Triple Cream Brie as a bonus cheese for us to try. This brie was super-duper creamy and almost tasted like butter. It wasn't so impressive when partnered with the fruits and nuts, but it was magic when spread on a cracker, so I imagine if spread on a hearty English muffin, it just might taste like bliss on bread.

Remember the Pecorino Heaven from the beginning? Well, none of us girls were ready to end this party, so we asked, "What about the Pecorino Tuscano? Is there any of that cheese left? We really should taste that without the adornment of walnuts and honey!"

Carrie had indeed saved some of the Pecorino for tasting which rallied an applause from the table, "More Cheese!" Of course, it was sublime and made everyone happy, but I'll be honest, as good as it was, I really loved it when softened.

Oh, did I mention the wine?

Carrie had three lovely bottles on the counter primed for consumption, but then the force, we affectionately refer to as Teri, came roaring in with not only Easter treats for all of us, she also brought wine. Not just any wine, but wine in a box! Teri knows her wine and she assured us that this wine would surprise us. This little box housed the equivalent of four bottles of wine for the low, low price of $15.00 conveniently found at World Market. Every time one of us would get up to pour our first glass and take our first sip, we could not help but exclaim, "That is good wine!"

There was one more cheese...one more surprise, but that will have to wait for another day. But as always, we present you with a photo of the deliciousness. Carrie had asked me to whip up some ice cream using a Danish Fontina Cheese, and I happily agreed to take on the task.

As always, it's not just your basic vanilla ice cream....there's a twist - a pungent and yummy twist - that we will share with you soon....stay tuned!


Carrie did a phenomenal job with this tasting and we had so much fun - as always! We were very happy to have Carrie's friend and fellow food lover, Anne join our party and hope she had fun as well. Our next party is CHOCOLATE and it's coming up soon - can't wait!

After chocolate, the Food Tastings we are gearing up for are:
1. Pestos
2. Exotic and Unique Fruits
3. Onions
4. (?)

Now go get yourself some cheese and wine and indulge as you wait for the chocolate!


Wednesday, April 7, 2010

Banana Split Cheesecake


Happy Birthday Jen!

In honor of Jen's big birthday I wanted to make something exceedingly delicious and completely brand new. With the weather being so spectacular it had me dreaming about summer. And what's more summer than a good old-fashioned Banana Split?

I served this at Easter brunch and adults and kids alike were begging for more. As crazy as it sounds..it tastes just as wonderfully perfect and refreshing as the real banana split. I don't know which would be more fattening, but who cares.....it's her birthday....and birthday calories are null and void!

Of course, the calories will add up for those of you at home, but I'm here to tell you it's worth every single additional pound on the scale!


Banana Split Cheesecake

Crust:

One Cup Chocolate Cookie/Wafer Crumbs
2 Tablespoons Sugar
One Tablespoon Butter, melted

Filling:
4 (8-ounce) blocks Cream Cheese, softened
8 Ounces Sour Cream
1-1/2 Cups Sugar
3 Mashed Ripe Bananas
3 Tablespoons Flour
2 Teaspoons Vanilla Extract
4 Large Eggs

Toppings:
1/3 Cup Canned Crushed Pineapple in juice, drained
1/3 Cup Strawberries or Cherries
1/3 Cup Chocolate Syrup
1/4 Cup Chopped Pecans, toasted
16 Maraschino Cherries, drained

Preheat oven to 325°.

To prepare crust, combine first 3 ingredients in a bowl; toss with a fork until moist. Press into bottom of a lightly greased 9-inch springform pan.

To prepare filling, beat cheeses and sour cream at high speed of a mixer until smooth. Add 1-1/2 cups sugar, banana, flour, and vanilla; beat well. Add eggs, one at a time; beat well after each addition.

Pour cheese mixture into prepared pan; bake at 325° for one hour and 10 minutes or until almost set. Cheesecake is done when the center barely moves when pan is touched. Remove cheesecake from oven; run a knife around outside edge. Cool cheesecake to room temperature. Cover and chill for at least 8 hours. Top each serving with pineapple, strawberries or cherries, chocolate syrup, pecans, and one cherry.


Note: It's your banana split, so top it off with the toppings of your choice. I like lots of pineapple, sour cherries, and a dab of melted dark chocolate........ :0)

Monday, April 5, 2010

Golden Roasted Caulifower with Pecorino Romano

My kids are normally pretty good about eating vegetables. Seriously...peas are their favorite! No one ever believes me, but it's true. Peas get requested every single day around here, which is why I've been on the hunt to find some new ways to prepare veggies that don't get a lot of requests. One of those veggies is cauliflower.

Now, Sheri and I have no issues with cauliflower. We've mashed it into "fake" mashed potatoes, like the South Beach dieters do, we've made soup with it, we've thrown it into our Roasted Vegetable Quesadillas and our Oven Roasted Veggies. Cauliflower is just gooooood, man! But the kids? Yeah, they don't like it so much. So when I was perusing Once Upon A Chef and saw this recipe (along with the assurance that her kids gobbled it right up), I was game!

Let me just tell you that this could not be easier. Wash up your cauliflower, dry it off, cut it into florets, sprinkle it with olive oil, salt, and pepper, roast it, and sprinkle it with Pecorino Romano. It's just that easy. And super tasty, too!! Give it a shot...we promise you won't be disappointed!


Golden Roasted Cauliflower with Pecorino Romano
by Once Upon a Chef

1 medium head cauliflower, cut into florets
3 tbsp. extra virgin olive oil
3/4 tsp. kosher salt
1/4 tsp. freshly ground black pepper
3 tbsp. grated Pecorino Romano cheese
a few sprigs of parsley, chopped

Set rack in the middle position and preheat the oven to 450. In a large bowl, combine the cauliflower florets with the olive oil, salt, and pepper, and toss to coat evenly.

Roast cauliflower florets on a baking sheet, stirring a few times to promote even browning, until tender and golden brown, about 20-30 minutes. (Keep an eye on it; you want the florets to develop deep golden spots. If it looks like they're getting too dark, turn oven down to 425.)

Sprinkle with grated cheese, then taste and add more salt and pepper if necessary. Transfer to a serving dish and garnish with parsley.


Saturday, April 3, 2010

Little Orange Muffins


We like muffins. A lot. There...I said it.

In our house, muffins are a staple. On Saturday or Sunday mornings, I generally feel that a "bigger-than-usual" breakfast is in order, and that is typically when I have the most time to do something a little creative. It's a great time to try out a new pancake recipe, breakfast casserole, quiche, breakfast burritos, or anything else you might think of trying. My kids have really begun to enjoy weekend mornings, and it's not because of the cartoons!

I found this recipe in the box for my new Pampered Chef mini-muffin pan, and thought it sounded tasty...not to mention, EASY!!! So we gave it a whirl, and let me tell you, they did not disappoint! They came together in no time flat, and the fact that they were mini muffins just added to their allure. My daughter kept exclaiming at how "cute" they were! Well they WERE cute, but they're pretty yummy too...so try 'em soon!


Little Orange Muffins

1 c. all-purpose flour
1/2 tsp. baking powder
1/4 tsp. baking soda
1/4 c. butter, softened
2/3 c. sugar
1 egg
1/2 c. sour cream
1/2 tsp. vanilla
2 tsp. orange zest

Preheat oven to 375 and spray a mini-muffin pan with non-stick cooking spray. In a bowl, combine flour, baking powder, baking soda, and salt. Stir well.

In another bowl, mix butter and sugar until well blended. Add the egg and whisk until smooth. Mix in the sour cream, vanilla, and orange zest. Add the flour mixture gradually, and stir until ingredients are moistened, but be careful not to over mix.

Using spoon, fill each muffin cup 2/3 full. Bake 12-13 minutes or until light golden brown. Cool in the pan for 3 minutes and remove. Cool slightly.

If you want a light topping for the muffins, you can dip the tops in melted butter and then dip in sugar. They're great with or without, so try them both ways!!

Thursday, April 1, 2010

Minty Mushroom Ice Cream

The more you expose yourself to new and exciting foods, the more you realize how many seemingly incompatible foods actually compliment one another beautifully. A few examples of this might be cayenne pepper in chocolate, pumpkin puree in lasagna, fresh basil in a lemon cake or mayonnaise in a chocolate cake. At first, you might be hesitant to give these odd couplings a taste, but if you open your mind and give them a chance, you just might discover a brand new flavor sensation.

With that said, we need you to check any reservations you have about mixing mushrooms and ice cream together at the door and open your mind to the possibility. Ironically enough, we did make a joke while making the Italian Stuffed Portabellas about how ice cream and Portabellas should never share space in the same sentence, but we were just setting the stage for this unique and Oh-So fascinating recipe.

We will be using mushrooms, however, we will not be using Portabellas – their flavor is too distinct and we are looking for the more subdued fungi flavor. We think you’ll be pleasantly surprised by how the mushrooms play off the bitter chocolate and how well they infuse with the peppermint and vodka. The best way to describe the unique flavor of this gourmet ice cream is Indescribable!


Minty Mushroom Ice Cream

2 Cups Whipping Cream
1/2 Cup Ricotta Cheese
3 Cups Sugar
1/2 Pound of White Button Mushrooms – no exceptions
4 Ounces Bittersweet Dark Chocolate, shaved or finely chopped
2 Tablespoons Vodka (Optional, but recommended)
One Teaspoon Peppermint Extract

*****
1/2 Cup White Button Mushrooms, finely chopped
1/4 Cup Vodka

We know the list of ingredients seem a bit disjointed, but trust us, each one plays an important role in creating the flavor of this gourmet delight. Hang in there with us!

Pour the whipping cream into a chilled bowl and whip on medium speed until stiff peaks form. Add ricotta cheese and continue to mix. Add sugar and do the same. Set aside.

Run mushrooms through a food processor until "shredded." In another bowl, mix those mushrooms, chocolate, peppermint extract, and vodka together –tossing to coat.

Slowly fold mushroom mixture into creamed mixture. Pour into ice cream maker and follow instructions – usually twenty minutes. We highly recommend not eating the ice cream straight from the maker, but rather, pouring into a freezer container and freezing overnight.

While ice cream is setting in the freezer, place 1/2 cup finely chopped mushrooms in a bowl and pour 1/4 cup vodka over them. Let soak overnight.

When you remove the ice cream from the freezer, scoop into dessert bowls and garnish with shaved chocolate and vodka soaked mushrooms. Enjoy!


April Fooooooools!


NEVER EVER let anyone convince you to put mushrooms of ANY kind and ice cream together in the same bowl– it’s a sin! And as we’ve said before, they shouldn’t even share space in the same sentence! And vodka soaked mushrooms?!?! Really???


We Hope You Get To Make A Fool Out Of Someone Today!
But Beeeeeee NICE!