Wednesday, April 29, 2009

Heavenly Hashbrown Quiche

Do you ever get tired of the same old breakfast foods every day? I do. Sometimes I just want to mix things up a bit and try something different. It's a good way to start the day, and I really do believe that breakfast is our most important meal. In fact, I make a hot breakfast for me and the kiddos every morning. Barry is on his own, though, because I'm not up yet! LOL!!

So while I pondered making something different for Easter breakfast, I found this recipe in an old cookbook I had laying around and decided it was just the ticket because it sounded positively yummy! Now let me just assure you, it was a hit! It was very easy to put together, didn't take any uncommon ingredients, and was so savory that there was not a crumb left in the pie plate. I did make some minor adjustments, but trust me, they just made it better. And the great thing about this quiche? You can add in all kinds of combinations of veggies! Use your imagination! The recipe here is the watered down version, but I am already considering the possibilities. Zucchini, broccoli, onions, red peppers...you simply must try it!

Heavenly Hashbrown Quiche

3 c. frozen shredded hashbrowns, thawed
1/3 c. butter, melted

1 c. fully cooked ham, diced
1 c. shredded cheddar cheese
1/4 c. green pepper, diced
3eggs
2/3 c. milk
1/2 tsp. salt
1/4 tsp. pepper

Begin by pressing the hashbrowns between 2 paper towels to remove the excess moisture. Press them onto the bottom and up the sides of an ungreased 9 inch pie plate and drizzle with butter. Bake, uncovered, at 425 for 25 minutes. The hashbrowns will start to brown. Oh my, can you just taste them?

Now, combine the ham, cheese, and green pepper, and spoon it into the crust. In a small bowl, beat the eggs, milk, salt and pepper, and pour over the rest of the ingredients.

Reduce the heat to 350 and bake, uncovered, for 25-30 minutes or until a knife inserted in the center comes out clean. Let it stand for 10 minutes before cutting, so the center will set up nicely. Now, stand back and watch it disappear!

Coming Soon.... Sour Cream Cookies!

Monday, April 27, 2009

Pastitsio!


How good does that look?

I can tell you from experience, that the smell is even better!

What's in there, you ask?

A little bit of zucchini and red pepper sauteing in some garlic and olive oil with just a sprinkle of cinnamon and a dash of marjoram. You don't like zucchini? That's cool - you can totally use eggplant. There's also a swig or two of red wine in there and a handful of chopped fresh parsley and of course, cups and cups of deliciously diced tomatoes.

Just imagine layers and layers of the wine-infused vegetables, egg noodles tossed with Parmesan cheese, and feta cheese. What makes this dish completely irresistible is the warm, creamy, bechamel sauce we pour on top.

Can you see it?
Can you smell it?
Can. You. TASTE IT????

Ummmmm....

Let's make it for real, shall we?

Oh wait! Before we start, the original recipe called for lentils, but I think lentils are creepy and mushy. My mother used to hide them in her lasagna and I would get so upset. "You can't even taste them," she would say, to which I would respond, "Well then, how did I find them?" So, needless to say, the lentils were left out of this dish and replaced with good old hamburger. :)

Pastitsio

Vegetable Sauce
2 Tablespoons Olive Oil
One Cup Onions
2 to 3 Garlic Cloves
4 Cups Cubed Zucchini (one-inch)
One Cup Diced Red Pepper
1/4 Cup Dry Red Wine
One Teaspoon Ground Cinnamon
1/2 Teaspoon Dried Oregano
1/2 Teaspoon Dried Marjoram
Three Cups Undrained Canned Tomatoes, Chopped (28 ounce can)
1/4 Cup Parsley Chopped
Salt and Pepper to taste

One Pound Hamburger, cooked (optional)

Noodle Layer
8 Ounces Wide Egg Noodles
2 Teaspoons Olive Oil
1/2 Cup Grated Parmesan or Asiago Cheese

Bechamel Sauce
3 Tablespoons Butter
1/4 Cup Flour
2 Cups Milk, heated to just below scalding
1/8 Teaspoon Nutmeg
1/4 Teaspoon Salt or to taste
3 Eggs, lightly beaten

Cheeses
One Cup Grated Feta Cheese
1/4 Cup Parmesan or Asiago Cheese

Heat oil in a large saucepan and saute' the onions and garlic for about 5 minutes, until the onions are translucent. Add the zucchini, red pepper, wine, cinnamon, oregano, and marjoram; cover and cook on low heat for about 10 minutes, stirring often. Add the tomatoes, parsley, salt and black pepper and continue to cook on low heat for 15 to 20 minutes, until the vegetables are very tender. Stir in the cooked hamburger - if you want the protein.

Meanwhile, bring a pot of salted water to a boil, add the egg noodles, and cook for 8-10 minutes, until just al dente. Drain and toss with the olive oil and Parmesan cheese. Cover and set aside.

Melt the butter in a small heavy saucepan. Whisk in the flour and cook for 1 to 2 minutes, stirring constantly. Gradually add the hot milk and continue to whisk for several minutes, until the sauce thickens. Remove from the heat, add the nutmeg and salt, and then stir in the beaten eggs. Set aside.

Preheat oven to 350 degree. Oil a 3 quart, 9x13-inch baking dish.

To assemble the pastitsio, spread half of the vegetable sauce in the bottom of the baking dish. Layer half of the noodles on next and top with half of the feta. Repeat the layers of vegetable sauce, noodles, feta. Evenly spoon all of the bechamel sauce on top and finish with the Parmesan Cheese.

Cover and bake for about 25 minutes, then uncover and bake for another 15-25 minutes, until bubbly and golden on top.


Can you believe all those fabulous vegetables are hiding under that velvety bechamel sauce? Believe it, because it's alll in there!

Coming Soon... A Heavenly Hashbrown Quiche

Tuesday, April 21, 2009

Pumpkin Cupcakes


Now, you know how much we love pairing pumpkin and chocolate together, right? Well, if you tried the pumpkin chocolate chippers, here is another recipe I've perfected using those two complimentary ingredients! See, I had these 3 baking pumpkins still sitting here from the fall...and it was high time I used them! So I cut them into wedges, roasted them, pureed them, and was preparing to freeze all of that brilliant orange goodness...when I decided to use some of it right then. Why freeze it all when I could use some fresh??

I remembered a recipe I saw in Deceptively Delicious for chocolate chip cupcakes, and after looking it over, decided to tweak it a bit to my liking...and the following is what I came up with. They must be good, because the kids went nutty over them! Oh yeah, and Sheri had TWO!! (Sheri here... In my defense, I felt it was my job to taste-test the cupcakes once while they were warm and then again when completely cooled. I considered it my duty!)

Pumpkin Cupcakes


1-1/2 c. pumpkin puree
1/2 c. brown sugar
1/2 c. water
1/3 c. canola oil
1 tsp. vanilla
2-1/4 c. flour
2 tsp. flax meal
1 tsp. pumpkin pie spice
1-1/2 tsp. baking soda
1/2 tsp. salt
1/2 c. semisweet chocolate chips

Frosting

8 oz. cream cheese
1/3 c. maple syrup
2-1/2 tsp. vanilla
1/8 tsp. salt


Preheat your oven to 350. Put paper liners in 16 regular sized muffin cups. Take out your batter bowl if you have one, and if not, well...any old bowl will do. But I must say, I do LOVE my batter bowl! It shakes things up a bit! Now put your pumpkin puree, brown sugar, water, oil, and vanilla in and beat it until it's well blended.

In another bowl, mix the flour, baking soda, and salt. Slowly pour the dry ingredients into the puree mixture and mix them completely. Fold in those delightful chocolate chips, and we are ready to go! Fill the muffin cups 3/4 of the way full and bake until a toothpick inserted in the center comes out clean, about 23 minutes. Make sure you remove them from the muffin tins to cool before frosting them so the condensation doesn't build up and make the bottoms wet and sticky!

Now, let's make the frosting! What's a cupcake without frosting??? It must be noted here that I am not usually a fan of frosting. It's just too...sugary. But this frosting is different. It's sweetened with my favorite - REAL MAPLE SYRUP!!! And it's soooooo good! Beat the cream cheese, maple syrup, vanilla, and salt until smooth. Make sure you taste the frosting multiple times to make sure the consistency and flavor are perfect! Remember, we believe taste testing is a must!!!

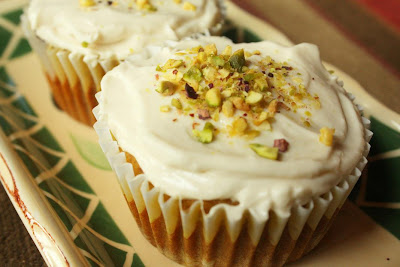
When the cupcakes are completely cooled and the frosting is just right, cover them in that sweet creamy goodness! You won't be disappointed!! I sprinkled crushed pistachios on mine, but only because I had some sitting there from a previous recipe. It's completely optional!

**We find that these cupcakes taste best when eaten fresh and warm!! The longer they sit, the denser they get!**


Coming Soon... Chicken, Cashews, Water Chestnuts and more....

Sunday, April 19, 2009

Cheesy Broccoli Bake

I found this recipe years ago when I was looking for something new to try, and I needed another creative way to use all of those hard-boiled Easter Eggs. I've made it many, many times since that day, always with great results. Sheri, however, had somehow missed it every time I made it until just recently. (How THAT happened, I'll never understand!) I think she may have been a bit skeptical about it as we were standing in the kitchen putting it together, but curiosity won out and she eventually took a bite. And her eyes got very big. And she said, "Wow, that IS good!! It definitely needs to go on the blog!" Ok, those may not have been her EXACT words, but it was close anyway.

But here's the deal, folks...this dish is just not pretty. It's really hard to get an appetizing picture of, because it has cream of mushroom soup and cheese, and when it bakes it gets all mixed together. So I guess what I'm saying is, you're just going to have to trust us that it tastes really good. We haven't led you astray yet, have we?

Cheesy Broccoli Bake

20 oz. cut broccoli (may use frozen)
1 tbsp butter

1/2 c. chopped onion

1 can cream of mushroom soup
1/2 tsp. ground mustard
1/2 tsp. salt

4 hard-boiled eggs, sliced

1 1/2 c. shredded cheddar

1 can french-fried onions


Begin by steaming your broccoli, but be careful not to overcook it, as it will also be going in the oven for a bit. Drain and set it aside. In a skillet or saucepan, melt the butter and saute the onion until tender. Stir in soup, mustard, and salt, and heat until bubbly. Place half of the broccoli in a greased 1 1/2 qt baking dish and top with half of the eggs, half of the cheese, and half of the mushroom sauce. Repeat layers. Bake uncovered at 350 for 20 minutes. Sprinkle the french fried onions on top and bake 5 minutes longer.


Coming soon...Another pumpkin recipe you don't want to miss!

Friday, April 17, 2009

Chicken and Bowties

Do you love pasta? We do. And I'll tell you something else...we never get tired of it. NEVER. There are so many awesome pasta-bilities out there, how can we?? Pasta with meat sauce, marinara sauce, pesto, chicken, beef, sausage, veggies, olive oil, garlic, cream sauce, shrimp...penne, bowties, spaghetti, thin spaghetti, angel hair, fettucini, shells, elbows, orzo, rigatoni...you name it, we like it! Pasta goes well with anything, you can throw it together in a matter of minutes, and it's just plain GOOD.

This particular dish has become one of our favorites over the years, because it has chicken, sun-dried tomatoes (YUM!), and cream. You just can't go wrong with those three ingredients. But it even has a teensy-tiny little kick to it, compliments of a bit of crushed red pepper thrown in. We do hope you'll try it, as everyone who does wants the recipe!


Chicken & Bowtie Pasta

8 oz. bowtie pasta
2 cloves garlic, minced
2 tbsp. EVOO
1 lb. skinless, boneless chicken breasts, cut into bite-sized strips
1 tsp. dried basil, crushed
1/8 tsp. crushed red pepper
3/4 c. chicken broth
1/2 c. oil-packed sun-dried tomatoes, cut into thin strips
1/4 c. dry white wine (optional)
1/2 c. whipping cream
1/4 c. grated parmesan + additional for garnish

Cook the pasta and drain. In a large skillet, cook the garlic in hot oil over med-high heat for 30 seconds or so. Now be careful and don't let the garlic brown, or it will become bitter! Add chicken, basil, and crushed red pepper. Cook and stir for 4 minutes, or until browned. Add the broth, sun-dried tomatoes, and wine. Bring to a boil, reduce heat, and simmer uncovered for about 10 minutes or until the chicken is tender, but not pink. Now, slowly stir in the whipping cream and 1/4 c. parmesan cheese. Simmer for about 2 minutes, then stir the pasta into the chicken mixture and heat through. Sprinkle additional parmesan on top and serve immediately. Be prepared to serve seconds!!

Coming Soon... A dish to help you use up all of those Easter Eggs!

Wednesday, April 15, 2009

Oven Fried Chicken

Now I don't know about you, but around here, we love chicken. It's one of the things I can always count on the kiddos to eat, and as you parents out there know, that is not to be taken lightly! This recipe is one of our favorites because it can be thrown together quite quickly and it makes the house smell amazing!!! I will often take advantage of sales and pick up family-size packages of drumsticks, because they are my kiddos' favorites. I use a few of them for dinner, and then freeze the rest in smaller portions. That way I can pull them out for a quick recipe such as this one. I've even been known to make a pan of oven-fried chicken with all drumsticks...it's fun, and I swear the kids eat more when I do!


Oven Fried Chicken

3/4 c. butter
3 garlic cloves, minced

2 c. breadcrumbs

2/3 c. fresh grated parmesan cheese

2 tsp. kosher salt

1/4 tsp. ground pepper

3 1/2 lb. chicken, cut into 1o pieces


Preheat your oven to 350. Melt butter with garlic in saucepan. Mmmmm...doesn't that smell good? Once the butter is all melted, transfer it to a large bowl and let cool. In another large bowl, mix breadcrumbs, cheese, salt & pepper. Dip each chicken piece into the melted garlic butter, then transfer to breadcrumb mixture and turn to coat on all sides. Don't be stingy with the breading! Now, arrange the chicken pieces in one flat layer on a large cookie sheet. Drizzle any remaining butter over the chicken and bake until lightly browned and just cooked through, about 50-60 minutes. I promise you'll have a line forming at your kitchen door...the smell is amazing!

Coming Soon.... Chicken with Bowties!

Tuesday, April 14, 2009

Chicken - Is Organic Important?

We’ve got a question for you. How healthy do you think you would be if you lived in a cage within a large sheltered warehouse, that provided artificial lights only, with next to nothing to do but eat and gossip, and you shared this warehouse with 25,000 other gossipers. How fat and emotionally unhealthy do you think you would you be? Seriously!

Welcome to the world of commercially raised chickens! Not only do they live under these conditions, but arsenic is a government approved dietary supplement for these poor chickens. Many producers claim that the arsenic does not end up in the meat, but in 2004 the National Board of Health warned that arsenic levels in chicken meat were a lot higher that previously acknowledged. When actual testing was done in 2006, it was found that three-quarters of conventional brands of chicken sold in supermarkets or fast-food restaurants contained detectable levels of arsenic, compared to only one-third of organic chickens. To be fair, we are exposed to arsenic in other areas, such as our drinking water, seafood, and building materials, so chickens are not the only source of this poison, but make no mistake about it – they are a source of arsenic in our diet.

Question number two: Have you ever tried to catch a chicken? They are super fast. They love to run and play and fight and be free.


Organic chickens that are afforded the luxury of regular exercise and arsenic-free food are sure to be healthier chickens, and in turn, a better source of meat protein for us, wouldn’t you agree? And maybe the 25,000 chickens caged sided by side in that large artificially lit warehouse don’t actually gossip, but seriously, what else are they doing in there – running in place and meditating?


To learn more, check out ….
To Buy or Not to Buy Organic by Cindy Burke


Coming Soon, as promised..... Oven Fried Chicken!

Sunday, April 12, 2009

Bedeviled Eggs with Basil

I think it's obvious by now that we just can't keep our noses out of the Moosewood Collective cookbooks, but can you blame us? These eggs are a perfect example of creativity, Moosewood style.

Who doesn't like Deviled Eggs? Well, actually some people don't, BUT a lot of people do. Growing up, deviled eggs were a staple at most family reunions, church gatherings, or school functions. It always seemed that every person who made their way through the buffet line came out the other side with one perfect little deviled egg somewhere on their plate. You make these Bedeviled eggs and word is going to spread like wildfire about the new fancy-schmancy eggs on the buffet. You know, the ones with the bright lemony flavor and flecks of basil - the ones people are grabbing two at a time! On second thought, you better make extras!

Now, most people make traditional deviled eggs pretty much the same way, except Aunt Dora who thinks deviled eggs is simply mashing together egg yolks and pickle relish. PASSSSSS!

But with these fantastic eggs, there is an undeniable freshness that completely sets them apart from the ordinary deviled egg. Do you love fresh basil? How about lemon? If you said "yes and yes" then we have a new and exciting deviled egg recipe for you!

Bedeviled Eggs

6 Large Eggs
2 Teaspoons Fresh Lemon Juice
3 Tablespoons Mayonnaise - NOT Miracle Whip
1/4 Teaspoon Freshly Grated Lemon Peal
Pinch of Salt and Pepper
2 Tablespoons Minced Fresh Basil

Place 6 eggs in pot and cover with water and lid. When water just begins to boil, remove from heat and set timer for 18 minutes. When 18 minutes are up, pour out the hot water and refill pot with cold water. Peel eggs. Cut eggs in half lengthwise and scoop out center yolk and place in a bowl.

When all the yolks are in the bowl, mash them. Add mayo, lemon juice, and zest. Add the basil leaves and stir together. Add salt and pepper to taste.

Mound the whites with yolk filling. Garnish with fresh basil.

We find that these taste even better the second day because by then the basil and lemon have become very well acquainted, if you know what we mean.

*******

Anybody notice how bright yellow the yolks are in the picture above? That is not Photoshop people - THAT is free range, organic eggs! Chickens that are allowed to run and exercise and not be loaded down with antibiotics produce a very brilliant yellow yolk and the flavor is substantially better than that of yolks from chickens who live in prisons. We will talk more about buying this type of eggs later, but you can find these cage-free eggs in most of your regular grocery stores.

Happy Easter Everyone!!!


Coming Soon... Oven Fried Chicken!

Saturday, April 11, 2009

Asparagus Frittata


Do you know that I never tried asparagus until I was 22 years old? Growing up, my father had the biggest garden for miles around where he grew lots of fruits and vegetables - so many, that we spent most of the month of August each year canning all that produce, but he never grew asparagus.

So, I was 22 years old and a lovely couple who were patients of mine, invited me to their house for dinner. The wife asked, “Do you like asparagus?” I thought to myself, “aspara-what?” If I remember correctly, in that moment I responded that I did, but later that evening during dinner I came clean and admitted I had never even heard of asparagus and had no idea what it was.

Being friends with Jen, it’s hard not to be a fan of the vegetable because she Loooooves asparagus! Between her serving it for dinner frequently and eating at restaurants that like to compliment their fish and salmon with it, I have grown to have a sincere appreciation for this vegetable. I don’t know that my appreciation will ever grow into the sappy kind of love Jen feels for it, but one can never tell…..

So, if you have a sincere appreciation for the flavor and health benefits of asparagus or better yet, feel a sappy kind of love for it, then this Frittata is right up your alley. Now, frittata is like the pizza of egg dishes, which means anything goes! It's like making an easy omelet with any vegetables or meat you want. Today, we want asparagus.


Asparagus Frittata

2 Cups Asparagus, cut in 1/2 inch pieces
One Cup Yellow Squash, cut in small pieces
1/2 Cup Green Onions, cut into 1/2 inch pieces
6 Eggs
1/2 Cup Ricotta or Cottage Cheese or Sour Cream
2 Tablespoons Water
One Tablespoon Chopped Fresh Parsley
One Tablespoon Chopped Fresh Marjoram (one tsp dried)
One Teaspoon Salt
1/4 Teaspoon Black Pepper
2 Teaspoons Olive Oil
1/4 Cup Grated Parmesan Cheese

In a large bowl, whisk together Ricotta cheese, eggs, water, parsley, marjoram, salt, and pepper. Blanch the asparagus in boiling water to cover for 2 to 3 minutes. Drain and plunge into cold water, then drain again and set aside.

Saute' yellow squash in oil until softening and then add scallions and cook one more minute. Stir in asparagus.

Preheat oven to 350 degrees. Transfer the vegetables to a greased 9-inch pie pan. Pour the egg mixture over the vegetables and sprinkle the Parmesan on top. Bake for about 30 minutes, until golden and set. Cool on a rack for a few minutes before serving.

This reheats beauuuuutifuly!


Coming Tomorrow.... The New And Improved Egg Just For Easter!

Friday, April 10, 2009

Tilapia with Lemon Vinaigrette


Normally, every day could be considered a party around here, but today is Good Friday, so it's the perfect day to introduce a simple fish recipe. This recipe is not a fancy or elaborate one, but it's perfect for the day that it is. With this dish, it's not so much how you cook the fish, but rather, what you cover it with. The vinaigrette used to drizzle over the Tilapia was originally intended to cover a fish baked naked, but it also compliments a breaded fish too.

The Tilapia pictured above has been rolled in flour, an egg wash, and then cornmeal. It was then cooked in a skillet with a touch of oil. Ummmm! You could skip the first two steps and go straight to the cornmeal and then the skillet, or like the original recipe suggests, simply bake the Tilapia with a touch of butter or lemon. You choose! All three taste great, even though the fish simply baked probably allows for the fresh taste of the vinaigrette to shine through a bit more.

This vinaigrette is perfect for brightening up any fish by adding a little zest, yet it's still simple and light.


Tilapia with Lemon Vinaigrette

1/4 Cup Lemon Juice
1/4 Cup Italian Parsley Leaves
2 Cloves Garlic
2 Teaspoons Lemon Zest
1/2 Teaspoon Salt
1/4 Teaspoon Pepper
1/3 Cup Olive Oil

Blend lemon juice, parsley, garlic, lemon zest, salt, and pepper in a blender. With the machine running, gradually pour in oil. Season the vinaigrette to taste with more salt and pepper.

Prepare thy fish and then drizzle with thy vinaigrette!


Coming Tomorrow.... An Asparagus Inspired Frittata For Easter Brunch!


Tuesday, April 7, 2009

Happy Birthday Jen!


The first time Jen invited me to her house 13 years ago, it was for a Pampered Chef / volleyball party. I went with the intention of playing volleyball, which I did, but when it came time to talk kitchen tools I found myself ‘all ears‘. Of course, if you’ve ever been to one of these parties, you know that they make the food right in front of you and then you get to eat it! What a great party! A friendship was born that day and our shared appreciation of food has grown right along with our friendship.

We took a Tae Kwon Do class together once. Just fifty dollars a month and you could attend as many as four classes a week – what a deal, right? Yeah, we were the only adults in the class and the “Master” let her 13 year-old black belt student with a goofball attitude run the class. He was a clown on a power trip as he barked orders at us like we were his own personal concubines. When it was time to “spar” with us, he used to run around in circles like a girl because he was too afraid to “fight” us head on – black belt, eh?

One day as I drove up for class, everything inside of me was screaming, “I don’t want to go today!” It seemed that once we had received our yellow belts, the learning suddenly stopped, but the wackiness of the class raged on. Before I knew it, I had driven my car across the street and had parked it in an empty lot, waiting for Jen to show up. When she did, I honked my horn to get her attention and waved her over. We both agreed that going to Happy Hour for wings sounded like more fun, so off we went. After a few “classes” like that, Barry spoke up as the voice of reason and said, “If you don’t want to go anymore, then stop paying and stop going.” So we did.

Then it was Broadway shows, concerts, yoga, fake knitting, beading, biking, ocean vacations, you name it. Whenever I had something I wanted to do, she was always on board. And if I didn’t think of it first – and I usually didn’t – Jen was always planning something fun and exciting and new to do.

Jen is a YES girl. She says Yes! to life every day. She lives life with enthusiasm and zest. She loves to have fun, she wants others to have fun, and when she’s around, others DO have fun!

She is a super freak when it comes to comedy. She can watch The Office, The Jerk, and anything Will Ferrell stars in, 97 times and laugh just as hard every time. She can repeat lines from a comedy she has seen just once and I think that’s because comedy just sticks to her bones naturally.

She regularly invites me to dinner at their house by gushing over the fabulous dessert she is making because she thinks that will get me there. That may say more about me than it does about her, but you get the idea...

She would do anything for anybody. Between her and Barry, they are extremely generous with their time and talents when someone is in need.

She is my sanity checker. When I vent to her about my trials of the day, she is always on my side, rooting me on and taking my side no matter what. Having a friend like Jen support you when life is getting you down is what I’m sure God had in mind when he created friendship.

As a mother, she is loving and creative and childlike. Her children always want to be with her because she makes life fun. She IS a fabulous mother!

I am very blessed to have Jen as my friend and I thank God on a regular basis for sending her into my life. Good, strong, and true friendships are rare and priceless and some people never experience them. I consider myself to be a lucky girl!

Did I mention she can cook?


Happy BirthMonth Jen!

Love,
Sheri


Coming Tomorrow... Chocolate Truffle Cheesecake Just For Jen!!! (Award-winning) and then NO more sweets for awhile...

Monday, April 6, 2009

Taste Testing Bread

The Food Tasting Group met for the second time last Sunday, and Karen was our fabulous hostess. She had chosen bread as the food of choice and had many different kinds for us to sample. Patty, the Naturopath contributed to the party by bringing 2 loaves of bread that aren’t available in any of our local health food stores. This ended up being a big teaser in the end, since one of her breads ended up being one of the favorites.

We taste tested ten different breads, mostly from the specialty store Trader Joes. There was a wide variety from Sourdough to Millet to Spelt to Potato to Focaccia to Mock Rye. Some were gluten free and most were high fructose corn syrup free.

There was no obvious winner among the ten, but the one bread that impressed and surprised the most of us was Lori Bakes Gluten Free Millet Bread. Everybody was surprised by the flavor and consistency – some thought it was similar to day old cornbread while others likened it to pound cake. It was very airy and light and crumbled easily. The taste was mild, but pleasant. Patty insisted that not only did it taste better when toasted, it crumbled less, so we decided to put that theory to a taste test and guess what? We all agreed with Patty. Take a look at how much was left by the end of the party...


The millet bread contained water, egg white, millet flour, potato starch, white rice flour, cornstarch, tapioca flour, nonfat instant dry milk, canola oil, sugar, xanthan gum, salt, active dry yeast, distilled white vinegar.

With Patty’s business and connections she is fortunate enough to have access to this bread, but the rest of us are not as lucky since none of the health food stores in our area are carrying it at this time. I think we need to change that.

Trader Joe’s Sourdough bread won the hearts of a few of the testers with it’s minimal ingredients of enriched flour, water, light rye flour, and salt.

Trader Joe’s other Sourdough bread with Asiago and Black Peppercorns caught a few people’s attention as well. I can tell you personally that if you cracked a little peppercorn in your mouth, it would definitely get your attention! The ingredients for this bread favorite were minimal as well – including wheat flour, water, sea salt, asiago cheese, and peppercorn.

There was a Potato Bread by Schwebels with high fructose corn syrup, artificial flavors, and other undesirables, and newcomer, Joanne was a big fan of that one. I don’t think the rest of us argued that the taste was pleasant, I just think we all knew from the first bite that there was nothing healthy about the loaf, end of story.

Trader Joe's Spelt bread and Rosemary Focaccia got a nod or two from the crowd, but they were not majority winners.

The Mock Rye by Lori Bakes was definitely not as big of a hit as the Millet bread had been, mostly because there weren’t a lot of rye fans at the table. Patty did mention that she has clients that love rye and typically can’t find gluten free rye, so this is a big bonus for the gluten free rye lovers out there.

So what did we learn today? Lori Bakes is a company that bakes gluten free breads and does it well. There is a much higher demand out there for gluten free foods, so next time you’re in your health food store, look for Lori Bakes products and give them a try. If your store does not carry them, speak up and ask that they do.

Next Food Tasting is Cheese and Wine!! Who wants to Come?!

Sunday, April 5, 2009

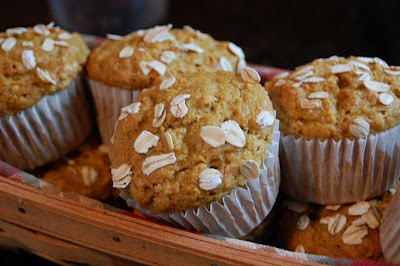
Perfect Pumpkin-Oat Muffins


You may have noticed that we have a thing for pumpkin. Kind of like the "thing" we have for Matthew McConnaughey, but just a *little* less intense. But seriously, we really like pumpkin! What's not to like, after all? It's high in Vitamin A, Vitamin C, and Beta Carotene. It's slightly sweet, and can be used in a myriad of ways, from cookies, cakes and breads, to ravioli, roasted veggies, and soup! And really, folks, anyone can grow pumpkin plants right in their own yard...and roasting them or pureeing them is really no big deal...and SO worth it!!

These particular muffins are light and tasty, and mildly sweet. They are good for breakfast, or as a mid-day snack! We've even been known to freeze them individually, so we can grab one on the go when there's no time for a full breakfast. And yes, you can definitely use applesauce instead of the oil, but you don't necessarily have to. You may also consider using half oat flour and half white flour, just to increase the health benefits.


Perfect Pumpkin-Oat Muffins

1 1/2 c. flour
1/2 c. old-fashioned oats
1/2 c. chopped walnuts (optional)
2 tsp. pumpkin pie spice
2 tsp. baking powder
1/2 tsp. baking soda
1/2 tsp. salt
1 c. pure pumpkin puree
1/2 c. honey
1/3 c. apple juice
2 large eggs
1/4 c. oil
2 tbsp. old fashioned oats

Preheat your oven to 375. Either grease your muffin tins or use some fun paper liners. Combine flour, 1/2 c. oats, nuts, pumpkin pie spice, baking powder, baking soda, and salt in a large bowl. In another bowl, beat the pumpkin, honey, apple juice, eggs, and oil. Add to flour mixture and stir just until blended. Spoon into prepared muffin cups, filling 3/4 full. Sprinkle with 2 tbsp. oats.

Bake for 23-27 minutes. Take out of pan and cool on cooling rack. Serve warm, or freeze for up to 3 months.


Coming Soon... OUR Birthday month continues as we celebrate Jen's Birthday!

Friday, April 3, 2009

Sheri's Birthday Dessert


By all accounts, Sheri and are a bit gratuitous when celebrating our birthdays. We use our birthdays to justify just about anything we want to do for the entire year, but most especially for the entire month of April. That's just the way we Aries girls roll! LOL!

This year, I made a special dessert for Sheri's birthday, because, well...I didn't want to just make a normal cake. I wanted to make something as unique as Sheri is. And because she loves lemon so much, this luscious recipe had me right away. It's from one of our favorite sources, The Best of Bridge, and although the recipe looks long, I assure you it was very easy to put together! If you have an insatiable love for lemon, you must try this!

Sensational Lemon Roll

Sponge Cake
:

3 eggs
1 c. sugar
1 c. flour
1 tsp. baking powder
1/4 tsp. salt
1 tbsp. grated orange rind
1/3 c. fresh orange juice
1 tsp. vanilla
1/3 confectioners sugar

Lemon Filling:

2 eggs
1 c. sugar
1 tbsp. grated lemon rind
1/2 c. fresh lemon juice
1 c. whipping cream
strawberries to garnish

Alrighty then...let's start with making the sponge cake, shall we? Preheat your oven to 375. Line a 10"x15" edged cookie sheet with parchment paper or waxed paper. In a large bowl, beat the eggs until frothy. Now gradually beat in the sugar and continue beating until thick and pale yellow, at least 1 minute.

Mix together the flour, baking powder, and salt. Add to egg mixture. Then, add the orange rind, orange juice, and vanilla and beat on low speed until combined. Spoon into your prepared pan, making sure to push the batter into the corners, and bake for 15 minutes. The cake should be golden brown and springy to the touch. Be careful not to overbake!!! Place a clean tea towel on the counter and dust with confectioners sugar. When the cake is done, loosen from the edges with a knife and invert it over the towel. Remove the parchment paper and trim off the crusty edges. Starting from the short end, roll up cake and towel together; place on a wire rack to cool. Don't worry if it cracks or splits. We don't worry about such things around here...we're not perfectionists!

Now it's time to make the lemon filling. In a double boiler, use a whisk to combine eggs, sugar, lemon rind and lemon juice and cook until thickened, about 15 minutes. Cool. Whip the cream and then fold into the lemon mixture. Cover and refrigerate until ready to assemble the roll.

When you're ready to put it all together, carefully unroll the cake and remove the towel. Reserve 1/2 cup of lemon mixture for decoration. Spread remaining mixture on the cake and gently roll up cake. Place seam side down on a pretty little serving platter and decorate with reserved filling, strawberries and a sprinkling of confectioners sugar. Refrigerate for at least 4 hours before serving.


Coming Soon...Perfect Pumpkin-Oat Muffins!!!

Thursday, April 2, 2009

Happy Birthday, Sheri!


Hey everybody...it's Sheri's birthday today!!!

You know, Sheri and I have been friends for years...so many years, in fact, that I'm not sure how many! I'm thinking it's somewhere around 12 or so. I've been lucky enough to have some very good friends in my life, but none quite like her. Sheri sometimes feels like an extension of me...do you know what I mean by that? We finish each other's thoughts, come up with the same ideas at the same time, have a lot of the same opinions...and though we always have each other's back, we will still be there to provide a reality check, if needed.

Sheri is probably the most generous, fun, and creative person I know. She paints, cooks, draws, writes, makes her own cards, takes amazing photos, beads, knits...well, you get the idea. There's not much she can't do! She is my best friend, and I can't imagine my life without her. And I'll tell you what...some lucky guy out there better get his butt in gear and find her, because he doesn't know what he's missing!

Happy Birthday Sheri! Wishing you another wonderful year!


COMING SOON...
Sheri's Birthday Dessert from ME!!!!